How To Move or Migrate SQL Server Workload to Azure SQL Database


Migrating SQL Server Database to Azure SQL (PaaS)

In this article, we will highlight SQL Server Data migration to Azure SQL (PaaS). You can find different approaches for this migration process because SQL Server offers different types of tools and features for this migration. Some of these are:
  •   Database Migration Assistant
  •   SQL Server Management Studio Deployment Wizard
  •   SQL Server to Azure SQL replication

Data Migration Assistant DMA :

The Data Migration Assistant (DMA) enables you to upgrade to a modern data platform by detecting compatibility issues that can impact database functionality on your new version of SQL Server and Azure SQL Database. It recommends performance and reliability improvements for your target environment. It allows you to not only move your schema and data, but also uncontained objects from your source server to your target server.

Features which are provided by Database Migration Assistant play a key role in the migration process.
These are:
· DMA explores compatibility problems which can block or stop migration.
· DMA explores the current database features which are unsupported or partially-supported by SQL Azure.


These two features are very useful for us because when we start to migrate an on-premises database to SQL Azure, some of its features or objects may not be supported by Azure SQL. In this case, we need to fix or find the solution to migration issues. At this point, we will take advantage of Database Migration Assistant.

For More : https://blogs.msdn.microsoft.com/datamigration/dma/

Login into the Azure Portal.

From All Services select : SQL databases


Click on +Add button to create new SQL Database. Specify the Name and resource group.
we will create a blank database in SQL PAAS platform which will absorb on premise data
Click Pricing tier to specify the service tier, the number of DTUs, and the amount of storage. Explore the options for the number of DTUs and storage that is available to you for each service tier. After selecting the server tier, the number of DTUs, and the amount of storage, click Apply.


Below is the snap of our On-premise database, that we will be migrating to SQL Azure.


Once the provisong has been completed successfully,  you can download the Data Migration Assistant tool from the given link Click here . Install this tool in your on-premise machine.


Launch the Data Migration Assistant Tool.
Click (+), Select Assessment and provide other details as shown below.


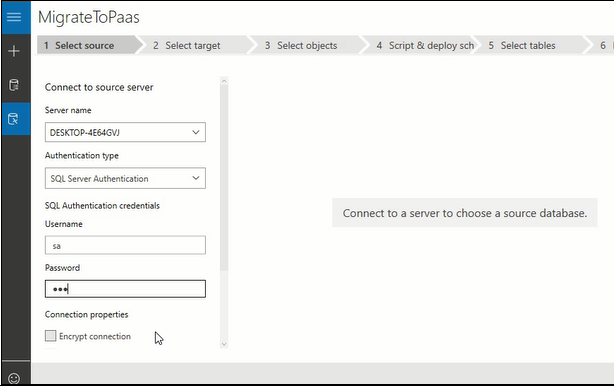
Specify the on-premise Server Name and authenticate as shown below.


+Add Sources


Click on Start Assessment to begin assessing your on-premise database before migration.


As you can see, Assessment is completed successfully. You can export the report in Json format and save it in your local drive.


Also check for the compatibility issues as shown below.


Click (+) button to begin Migration process.


Select the source that is your on-premise database as shown below.


 Select the database that you wish to migrate to SQL Azure.


Select the target, here you mention the server name that we created while provisioning ‘SQL Azure PaasDB’ as shown below. Then click on connect.


 This will give you error. Note down the IP address from the error details.


Go to Azure Portal, click on set server firewall as shown below.


Here you mention the IP address that was shown in the Error details from Data Migration Assistant tool. Click on Save button and once saved go back to Data Migration Assistant tool.


Select the database as shown below. Click Next


Select the Schema Objects from your source database that you would like to migrate to Azure SQL Database and click Generate SQL Script.


Once the script is generated successfully. Click on Migrate Data as shown below.


Select the table and click Start data Migration as shown below.


As you can see below we have successfully migrated on-premise database to SQL Azure using Data Migration Assistant Tool.


You can access the SQL Azure using SSMS as shown below, note to provide username and password of the SQL server that we created while provisioning SQL Azure paasDB.


Video Tutorial -->  Click here

Thank You :)


How to monitor Exchange Queues?

How to monitor Exchange Queues?

How to monitor Exchange Queues / How to setup an Alert for Exchange Queues...


#Author : Nishant Naidu

#Technet - i-TechNinja

# https://social.technet.microsoft.com/profile/i-tech%20ninja/
#https://itechninja.blogspot.in/
#https://crazycerebro.blogspot.in
#https://social.technet.microsoft.com/wiki/contents/articles/47620.how-to-monitor-exchange-queues-how-to-setup-an-alert-for-exchange-queues.aspx

#load Snapin
Add-PSSnapin Microsoft.Exchange.Management.PowerShell.SnapIn;

#Set Mailing parameters
$sendMailMessageParams = @{
    Smtpserver = " smtp server "
    To         = " To? "
    From       = " From? "
}


# HTML Body 
$head = "<style>",
        "BODY { background-color: white; }",
        "TABLE { border-width: 1px; border-style: solid; border-color: black; border-collapse: collapse; }",
        "TH { border-width: 1px; padding: 5px; border-style: solid; border-color: black; foreground-color: black; background-color: LightBlue}",
        "TD { border-width: 1px; padding: 5px; border-style: solid; border-color: black; foreground-color: black; background-color: white}",
        "</style>" | Out-String
 #Logic to setup
if ($Queue = Get-ExchangeServer | Where { $_.isHubTransportServer -eq $true } | Get-Queue | Where-Object { $_.MessageCount -gt 200 } | Select Identity, DeliveryType, NextHopDomain, RiskLevel, MessageCount, Status, Velocity) {  $body = $Queue | ConvertTo-Html -Head $head | Out-String
#Invoke     
Send-MailMessage -Subject "Exchange Queue Alerts-Threshold 200" -Priority High -Body $body -BodyAsHtml @sendMailMessageParams
}
else{
    Send-MailMessage -Subject "Exchange Queue Alerts-Threshold 200" -Body "Queues are below Threshold limit - 200 "-BodyAsHtml @sendMailMessageParams
}

How to Use?

1. Save this file as .ps1 wherever with whatever name you want to.
2. Open Task Scheduler
3. Create a New task and set the task occurrence for this .ps1 file.

Thank You.
For any query, please comment down below.

#You can make use of BuyNow button for Donation purpose 

How to check Remote Server Configuration/Info - Using Powershell

How to check Remote Server Configuration/Info - Using PowerShell


With the help of this powershell script, you will be able to query a remote server and get their 
configuration setting information.

This will help and save lot of time since you dont need to login to any server to check the details.

The server that you are about to query should be firewall friendly, if you are not able to ping the server then you cant query any of the below remote server attributes.

Remote server Info Includes:

  • System Configuration Information
  • Services Information of a remote server
  • Drive Configuration of a remote server
  • Network Configuration of a remote server
  • Installed Hotfixes on a remote server
  • Processor Details of a remote server
  • Installed Application Details on a remote server
  • Administration information of a remote server

Let's begin 

Script

How to check System Configuration Information using Powershell

$path = "$([Environment]::GetFolderPath("Desktop"))\System Config Info.txt"; 
Get-WmiObject -Class Win32_OperatingSystem -ComputerName $d | fl * | fl > $path; 
notepad $path; 

How to check Services Information of a remote server using Powershell

$path = "$([Environment]::GetFolderPath("Desktop"))\Services Info.txt"; 
Get-WmiObject -Class Win32_Service -ComputerName $d | Out-File $path 
notepad $path; 


How to check Drive Configuration of a remote server using Powershell

$path = "$([Environment]::GetFolderPath("Desktop"))\Drive Info.txt";
"Drive information for $env:ComputerName" | out-file  $path -Append; 
Get-WmiObject -Class Win32_LogicalDisk -ComputerName $d | Where-Object { $_.DriveType -ne 5 } | Sort-Object -Property Name | Select-Object Name, VolumeName, VolumeSerialNumber, SerialNumber, FileSystem, Description, VolumeDirty, ` @{ "Label" = "DiskSize(GB)"; "Expression" = { "{0:N}" -f ($_.Size/1GB) -as [float] } }, ` @{ "Label" = "FreeSpace(GB)"; "Expression" = { "{0:N}" -f ($_.FreeSpace/1GB) -as [float] } }, ` @{ "Label" = "%Free"; "Expression" = { "{0:N}" -f ($_.FreeSpace/$_.Size * 100) -as [float] } } | Format-Table  | fl | out-file  $path; 
notepad $path;

How to Check Network Configuration of a remote server using Powershell
$path = "$([Environment]::GetFolderPath("Desktop"))\Network Config Info.txt"; 

$nwINFO = Get-WmiObject Win32_NetworkAdapterConfiguration -ComputerName $d | Where-Object { $_.IPAddress -ne $null } | Select-Object DNSHostName, Description, IPAddress, IpSubnet, DefaultIPGateway, MACAddress, DNSServerSearchOrder | fl > $path; notepad $path; 


How to check Installed Hotfixes of a remote server using Powershell

$path = "$([Environment]::GetFolderPath("Desktop"))\Installed Hotfixes Info.txt";
Get-WmiObject -Class Win32_QuickFixEngineering -ComputerName $d | Out-File $path # -Encoding UTF8 -Append -Width 1000
notepad $path; 


How to check Process details of a remote server using Powershell

$path = "$([Environment]::GetFolderPath("Desktop"))\Processor Info.txt";
Get-WmiObject -Class Win32_Processor -ComputerName  $d  | Select-Object -Property [a-z]* | fL * | fl > $path; 
notepad $path;


How to check Installed Applications details on a remote server using Powershell

$path = "$([Environment]::GetFolderPath("Desktop"))\InstalleApp Info.txt";

Get-WmiObject -Class Win32_Product -ComputerName $d | Sort-Object Name | Select-Object Name, Vendor, Version, InstallDate | Format-Table  | fl > $path;

notepad $path;


How to check Administration Information on a remote server using Powershell


$path = "$([Environment]::GetFolderPath("Desktop"))\Admin Info.txt";

net localgroup administrators | fl > $path;
#new admin info1
Get-WmiObject win32_groupuser -ComputerName $d | Where-Object { $_.groupcomponent -match 'administrators' } |

ForEach-Object { [wmi]$_.partcomponent } | out-file $path -append;
#new admin info2
Get-WmiObject -Class Win32_UserAccount -ComputerName $d | Format-Table | Out-File $path -Append; notepad $path;

Screenshots:


How to Use?

1. Download the RemoteServerInfo tool from the link given below

2. Double on the file to launch it, you need to extract zip before launching

3. Enter the hostname in the text area provided, as shown in the screenshot

4. Once you have entered the hostname, then select appropriate options from the drop-down
     menu that you want to query 

5. Click on 'Initialise' to get the results

Bydefault  the result will be saved in your desktop.

Note: Entered hostname should be able to respond to your ping request. It should be firewall friendly to return results for your query. 

Download


Thanks for Downloading.

For any query, please comment down below.

#Share this project with your friends.

#This is only for Educational Purpose

#If you like the post, then forget to share. 

#You can make use of BuyNow button for Donation purpose


Job portal system Php Project with source code

Job portal system Php Project with source code


Job portal system project is a web application which is implemented in Php platform. Job portal system Php Project tutorial and guide for developing code. Entity–relationship(er) diagrams,Data flow diagram(dfd),Sequence diagram and software requirements specification (SRS) of Job portal system in report file. Download Job portal system web application project in Php with source code Php project web mini and major project with source code. Synopsis of Job portal system available in project document. This source code import in netbeans for application development. Job portal system project source code for BE,Btech,mca,bca,engineering,bs cs,IT,software engineering final year students can submits source code in collage. Download Free Scripts,source Codes,Reviews and Much More. Job portal system Screen Shot. Job portal system is free download available here. We have grate project collection of Php with source code.


Project Title : Job portal system
Programming Language :
 php,java script,html,css,ajax,jquery
IDE Tool :
 netbeans
Database :
 mysql
Project Type :
 web Application

Screenshots:


Download


Thanks for Downloading.

For any query, Please comment down below.

#Share this project with your friends

#This is only for Educational Purpose

#For any custom based Project Requirements please comment down below

Have a Nice Day!

Student Record Management System Development on JAVA swing - JAVA Project

 Student Record Management System Development on JAVA swing - JAVA Project with Source Code


Student record management system development on java swing project is a desktop application which is implemented in Java platform. Student record management system development on java swing Java Project tutorial and guide for developing code. Entity–relationship(er) diagrams,Data flow diagram(dfd),Sequence diagram and software requirements specification (SRS) of Student record management system development on java swing in report file. Download Student record management system development on java swing desktop application project in Java with source code Java project desktop mini and major project with source code. Synopsis of Student record management system development on java swing available in project document. This source code import in eclipse,netbeans for application development. Student record management system development on java swing project source code for BE,Btech,mca,bca,engineering,bs cs,IT,software engineering final year students can submits source code in collage. Download Free Scripts,source Codes,Reviews and Much More. Student record management system development on java swing Screen Shot. Student record management system development on java swing is free download available here. We have grate project collection of Java with source code.

Project Title : Student record management system development on java swing
Platform :
 Java
Programming Language :
 java,core java,java swing
IDE Tool :
 eclipse,netbeans
Database :
 linked list
Project Type :
 desktop Application


Download


Thanks for Downloading.

For any query, Please comment down below.

#Share this project with your friends

#This is only for Educational Purpose

#For any custom based Project Requirements please comment down below

Have a Nice Day!

Android Project - SuperMario with Source Code

Android Project - SuperMario with Source Code


This is an Android Project on Super Mario.

Mario Game project is a game application which is implemented in Android platform. Mario Game Android Project tutorial and guide for developing code. Entity–relationship(er) diagrams,Data flow diagram(dfd),Sequence diagram and software requirements specification (SRS) of Mario Game in report file. Download Mario Game game application project in Android with source code Android project game mini and major project with source code. Synopsis of Mario Game available in project document. This source code import in Android Studio for application development. Mario Game project source code for BE,Btech,mca,bca,engineering,bs cs,IT,software engineering final year students can submits source code in collage. Download Free Scripts,source Codes,Reviews and Much More. Mario Game Screen Shot. Mario Game is free download available here. We have great project collection of Android with source code.

Project Title : Mario Game
Platform :
 Android
Programming Language :
 Core java
IDE Tool :
 Android Studio
Database :
 Sqlite
Project Type :
 game Application

Screenshots:


Download


Thanks for Downloading.

For any query, please comment down below.

#Share this project with your friends.

#This is only for Educational Purpose


Robust Copy large files over the network - using ROBOCOPY

Robust Copy large files over the network - using ROBOCOPY

Robust Copy large files over the network - using ROBOCOPY

Robust File and Folder Copy.

By default Robocopy will only copy a file if the source and destination have different time stamps or different file sizes.

Syntax 

robocopy source destination [file [file]...] [options]

file(s)_to_copy : A list of files or a wildcard.
                          (defaults to copying *.*)

Source Options:


/S : Copy Subfolders.
                /E : Copy Subfolders, including Empty Subfolders.
 /COPY:copyflag[s] : What to COPY (default is /COPY:DAT)
                      (copyflags : D=Data, A=Attributes, T=Timestamps
                       S=Security=NTFS ACLs, O=Owner info, U=aUditing info).
              /SEC : Copy files with SECurity (equivalent to /COPY:DATS).
          /DCOPY:T : Copy Directory Timestamps.
          /COPYALL : Copy ALL file info (equivalent to /COPY:DATSOU).
           /NOCOPY : Copy NO file info (useful with /PURGE).

                /A : Copy only files with the Archive attribute set.
                /M : like /A, but remove Archive attribute from source files.
            /LEV:n : Only copy the top n LEVels of the source tree.

         /MAXAGE:n : MAXimum file AGE - exclude files older than n days/date.
         /MINAGE:n : MINimum file AGE - exclude files newer than n days/date.
                     (If n < 1900 then n = no of days, else n = YYYYMMDD date).

              /FFT : Assume FAT File Times (2-second date/time granularity).
              /256 : Turn off very long path (> 256 characters) support.

Copy options

/L : List only - don’t copy, timestamp or delete any files. /MOV : MOVe files (delete from source after copying). /MOVE : Move files and dirs (delete from source after copying). /sl : Copy symbolic links instead of the target. /Z : Copy files in restartable mode (survive network glitch). /B : Copy files in Backup mode. /J : Copy using unbuffered I/O (recommended for large files). ## /NOOFFLOAD : Copy files without using the Windows Copy Offload mechanism. ## /ZB : Use restartable mode; if access denied use Backup mode. /IPG:n : Inter-Packet Gap (ms), to free bandwidth on slow lines. /R:n : Number of Retries on failed copies - default is 1 million. /W:n : Wait time between retries - default is 30 seconds. /REG : Save /R:n and /W:n in the Registry as default settings. /TBD : Wait for sharenames To Be Defined (retry error 67).

Destination options

/A+:[RASHCNET] : Set file Attribute(s) on destination files + add. /A-:[RASHCNET] : UnSet file Attribute(s) on destination files - remove. /FAT : Create destination files using 8.3 FAT file names only. /CREATE : CREATE directory tree structure + zero-length files only. /DST : Compensate for one-hour DST time differences. /PURGE : Delete dest files/folders that no longer exist in source. /MIR : MIRror a directory tree - equivalent to /PURGE plus all subfolders (/E)

Advanced Option:

/XL Excludes Lonely files and directories. /IT Includes Tweaked files. /IS Includes Same files. /XC Excludes Changed files. /XN Excludes Newer files. /XO Excludes Older files. /XX Suppresses reporting and processing of Extra files.

Example:

Simple copy of all files from one folder to another:
ROBOCOPY \\Server1\reports \\Server2\backup

Copy files including subfolders (even empty ones /E)  If this command is run repeatedly it will skip any files already in the destination, however it is not a true mirror as any files deleted from the source will remain in the destination.

ROBOCOPY \\Server1\reports \\Server2\backup *.* /E

Robocopy Older and Newer files:

"Newer" means that a file with the same name as the source file already existed in the target folder, and that the source file is newer than the target file (and the source file was copied over the target file). You can prevent these files from being copied by using /XN. Accordingly, "older" means that a file with the same name as the source file already existed in the target folder, and that the source file is older than the target file (and the source file was copied over the target file). You can prevent these files from being copied by using /XO.